The camera is a rather complicated device that requires certain knowledge of operation. Those who used to have already used any camera will be much easier to master new technique. But people who hold the device in their hands for the first time, may face a number of difficulties. Below will be described in detail about how to use the Canon mirror photo from the moment of the first inclusion and before connecting additional accessories.
Any mirror camera is in factory packaging in disassembled form. If we talk exactly, then the carcass, the lens and the battery are lying separately. First of all, it should be removed the protective cover from the lens and the camera itself. After that, the lens is put on the device. To do this, on the lens you need to find a white point and aligning it with a white point on the adhesive. After that, the lens turns clockwise until it clicks.
Second phase - installing battery. Make it is also easy enough. The battery compartment is located at the bottom of the camera and opens with a special latch. It must be pulled down, and the cover of the compartment will throw back. The battery is placed in the camera side with contacts. In general, it is impossible to confuse here, since it just does not fit.

The connector under the memory card is most often hidden under the lid of the battery compartment, but some models can be located on the right side. The memory card is inserted by the side too by contacts forward.

Most often, the camera in the box will be in a discharged form, or the battery will have a small charge percentage. Before the start of operation, it is best to charge it to fully so that it does not sat down during the first setting. Charging in most cases is carried out not by connecting the entire device to the network, but using a separate battery charger. The battery should be removed and inserted into charging. In the process, the red lamp will burn, which after the charging will turn green. In rare models, charging function is available via USB cable. Modern batteries do not require charging and plant them completely. They have no memory effectAs it was in old types of batteries, so the battery is not afraid of partial charging and discharge.

Tip! To charge the camera Canon, it is worth using original chargers. Only so you can extend the battery life and not spoil it ahead of time.
First inclusion
After the battery is charged and dressed lens, it's time to turn on the camera. Before using it, the initial setting will be required, during which the date, time zone, language and other system parameters are made. In fact, the initial configuration of the Canon camera does not require special knowledge or additional instructions. The device displays information on the display, and the user needs to be easy to operate according to the proposed actions.
After the first inclusion is completed, the camera in most cases will ask format a memory card. If the map is new, then such a need will appear exactly. This can be done in three ways:
- using a laptop or computer;
- with the direct request of the camera;
- through settings.
The first option to consider the meaning in detail, since it is not the best. The fact is that any technique formats the carrier for itself, and sometimes the situation is happening that the memory card formatted in the laptop is not read by the camera. For this reason, it is best to do with the help of that technique in which the card will be used.
In the case when the map is new, and the camera does not understand how to work with it, it will simply write on the display that you need to format the carrier, and will offer to do it right now. In this case, the user needs to simply agree.

If the card was used earlier or simply need to be cleaned, then formatting can be done using special options in the settings. To do this, press the "MENU" button on the device itself, then select the item with a hand-drawn key. In this menu item, you can change all system settings, for example, to re-send the date, and including format the memory card.
Tip! The device will offer two types of formatting: fast and usual. The first option is suitable for new cards, the second for previously used or those that issued errors.
Any camera, regardless of class, has different shooting modes. Some of them are automatic, and the second half will require you to configure one or another parameter for specific shooting conditions.

All Canon Camera Modes can be seen on wheel scroll modes - It is located on top. The selection of modes is carried out by rotation. White short feature notes which mode is selected, respectively, to select the other you need to scroll through the wheel to the desired option. The number of modes may vary depending on the model. At the same time, it can be reduced or increased only by automatic shooting programs. Semi-automatic modes are unchanged - there are always four of them.
TO automatic modes Macro shot (flower on the wheel), sports mode (running person), portrait shooting (human face), automatic (green empty rectangle) and others. In these modes, the user needs only to bring the camera to the object and after focusing, which is also automatically implemented, click on the shutter button.
Semi-automatic modes marked with letters M, AV, TV, P. When working with them from the photographer, it will take some knowledge and understanding of working with a diaphragm and excerpt. However, the pictures here will turn out more interesting.
R. mode
P or software mode It does not differ globally from automation, but allows the user to adjust the diaphragm in limited limits. It is also possible to adjust the white balance.
Most experienced photographers believe that the program mode is completely useless. The manufacturer notes that it will help novice users move from automation to manual settings.
AV mode
AV - Diaphragm Priority. In this case, the user itself sets the diaphragm size to experiment with the amount of light transmitted and the final image. Based on the size of the diaphragm, the camera itself chooses the exposure time and takes the picture. With this mode you can influence.
With this mode, you can adjust sharpness and make a blurred background. To make items on the photo clearer, you need to set a smaller aperture value if you want to blur the background and focus on the main objects, then great importance is selected for excerpt.
It is worth understanding that the diaphragm setting depends on the lens that is connected to the camera. That is why when changing optics, you need to choose not only the lens, but also to set new shooting parameters for it. Another nuance - on different cameras, the same lens may require new settings.
TV mode
TV - exposure priority. In this mode, the user selects the time that the diaphragm will skip light, respectively, the diaphragm size itself is automatically selected. Using such a function is indispensable when shooting sports events or moving objects. Also different time Exposures can give interesting effects, for example, a photo with wiring. The mode will like those who love to photograph any movement, independently, this is an animal or natural phenomenon.
M. M.
M - manual mode. With it, the user gains access to simultaneous aperture and excerpt. Suitable for those who know exactly what does, and what he wants to achieve. The mode is particularly good at night when the camera does not understand what a diaphragm and the excerpt should be exhibited. The user can select the parameters that he need. In such a mode, professionals are most often working. The user novice will simply not understand how one or another parameter affects the photo.
System settings
Cameras Canon have a wide range of settings. This may touch the shooting process directly, as well as the camera settings, for example, the format in which the snapshot will be stored, its size, etc. In the system settings, you can put a timer, synchronize the flash or format the memory card.
Quality and size photo
To set specific photo settings, you must press the "MENU" button and select the item with a drawn camera. It is here that all the settings associated with the photo are available.
Depending on the model, an item in which you can choose the quality of the photo will be called differently. Most often, the name speaks for itself: "Quality". In the CANON chamber, options are indicated by letters L, M, S1, S2, S3, RAW and RAW + L. All alphabetic options (L, M, S) are saved in JPEG format And among them means deterioration of quality from L to S3. Not only the quality of the photo is changing, but also its size, as well as how much he takes on the memory card. Obviously, it is best to choose L. option in this case.
RAW and RAW + L formats - This is the maximum photo quality and its size. Snapshots are saved in Raw and occupy a lot of space. Photos in this format resemble an electronic negative, which carries information about the photo, but not the image itself. Pictures in this format require mandatory processing on PC.
The advantage of the format is that it is possible to obtain more flexible image processing options in a professional editor on a computer. Minus - take up a lot of space and do not open without a special program.
Focus image
Focus image in the camera may be manual or automatic. In the first case, the user does everything alone with the power of the rotary rings on the lens. In the second case, automation works. To switch from one object to another, press the switch on the AF-MF lens. The AF mode in turn shares another two options.
- AF-S - Focus on frames. Its meaning is that the camera focuses on the selected object when the shutter button is easily pressed. It is best suited for shooting still objects. To set up a focus to a new object, you need to release the button and reinstall the camera for shooting.
- AF-C - Continuous Focus. Its meaning is that when you click on the button, the camera continues to monitor the object, even if it moves. Obviously, it is more convenient to use this type of autofocus when shooting sports events.
An important moment - focus point selection. Modern cameras offer from 9 to 50 points. In this case, there is a major object on which the focus is carried out, the other points focus on other subjects. When the photographer looks into the viewfinder, he sees several points, active is highlighted in red. To make an active focus point, which is combined with an object, you need to use a small wheel on the camera or navigation buttons. At first glance, it may seem that it is much easier to shift the camera and thus combine points. But there is a nuance: when changing the position of the camera, the exposure is changing, that is, the whole idea can be spoiled. Using the navigation keys, the user can make several pictures of one object, but at the same time focus each time at the new point.
Work with extract
Camera extract is a parameter that is measured in seconds, or rather fractions of a second. The physical meaning of excerpt is that this time for which the light passes through the diaphragm and falls on the matrix. Obviously, the more time the light falls on the matrix, the brighter will be a picture. This is important when shooting in poor lighting, but there is also the reverse side of the medal. A large number of light can take a snapshot of the mounted and give blur in the frame. To get the lubrication effect, put the shutter speed longer if sharpness is required, the time is set minimum. You can adjust the shutter speed in manual mode or prioritize excerpts.

What is white balance
White balance is the correctness of the display of colors in the picture. As you know, the color spectrum can have coolest or warm values.
An example is a photo of a person. With a normal balance of white leather, the face will be natural. If the spectrum rolls to heat, then the skin will be yellow, if to the cold part, then all the photos will be given to blue.
Obviously, depending on the lighting, the spectrum may vary, and the photo will have unnatural colors. The sun rays or the incandescent lamp have a warm tone, but the day lighting lamp makes the image "cold." And it is in such situations that the white light balance is required.
All Canon cameras have special WB buttonwhich opens the white balance setup menu. Here there is an option to select already preset modes that are indicated by schematic patterns. For example, the sun means the optimal settings for shooting outside during the daytime. In the same way, auto-tuning is selected for other situations.

However, the camera makes it possible not only to use pre-installed options, but also adjust yourself. This process is similar to the use of light filters and will not suit lovers. To do this, click the "MENU" button, select the item with a drawn camera and find the "BB shift" line there. Next, the display opens the correction screen that is divided into four parts with two straight. Each of them is indicated by letters:
- A - amber,
- M - Purpur,
- G - green.
Cursor shift (on the screen is displayed as a black square) leads to an increase in one of these colors or their combination.
How to set a date on the photo
Sometimes there are situations when it is required that the date and time of the picture is displayed in the photo. In modern mirror cameras, such a function is no longer there, since, in general, the date spoils a photo, and with particular necessary it can be placed in the photo when printing pictures. The printing program extracts the date and time from the photo information and places angle. In simpler devices, for example, compact camerasThis feature is. You can set the date in menu Settings Photos. You should find the item "Display the date and time in the photo". At the same time, the user will pre-configure the date and time format.
Photo with timer
Make selfie on a mirror camera is quite difficult. It is for this that the manufacturers have provided a timer that is set for a few seconds and takes a picture after this time. To use the camera's function, you must first install it, ideally for a tripod, select the exposure, check that everything falls into the frame, and then select a timer and response time using a special button on the housing. Button marked by a clock icon. Due to the fact that the device makes a beep after each second, you can know exactly how much the shutter will work and have time to take your place.

Using the outbreak
Outbreaks for the camera are two types - built-in and outdoor. The first is built directly into the chamber carcass and opens if necessary. In automatic mode, the process is regulated by the chamber itself, in manual mode, turn on the flash using a special button (zipper), which is usually located next to the flash itself.
How flash works
The main point to know about the work of the outbreak is its power. Obviously, it can not shine with one power, since the level of lighting can be different. For this reason, the flash works in three stages:
- determining the level of lighting;
- frame exposure;
- snapshot.
In other words, the flash works very quickly three times in a row. At the same time, the snapshot is made on the third flash, and about 10% of people have high sensitivity to light and notice the first two outbreaks. Thus, in the photo such people are obtained with closed or half-closed eyes. The process of determining and exposure is called TTL. Professional photographers know that TTL can be turned off, and then the power has to be selected manually. This is quite difficult, but more conveniently, and in this case you can choose the optimal flash power.

Features of the outer outbreak
External flash has several advantages Before built-in.
- It is more powerful, can be directed at an angle or from above, which makes lighting and shadow more natural.
- Another advantage is the range. Standard flash may highlight an object within 4-5 meters in front of them.
- External flash provides more flexible lighting settings.
Tip! When setting up the flash, you must set the excerpt value. Given that at the time of a picture of light on the object there will be more, the excerpt is not needed, except when this is done to obtain an unusual effect. According to experienced photographers, optimal time Exposures when shooting with flash - 1/200-1 / 250.
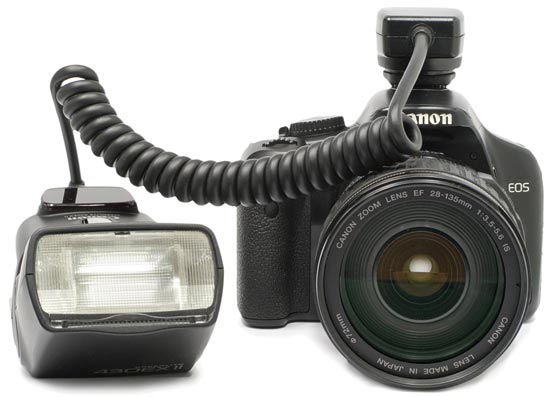
There are two options for external flash - wireless and wired. The second option is connected directly to the camera via a special connector for connecting. It looks like a metal socket on the top of the camera. Often it is closed by a plastic plug. You can connect the flash using a special cable that allows you to slightly remove the flash from the camera. Cable length from Canon is 60 cm. Wireless option is the most convenient, as the photographer does not interfere with cords. In this case, a special transmitter is inserted into the flash groove, which sends a signal to the flash of what you need to work. This transmitter contains all power control buttons.
What is synchronization
Currently, the flash synchronization has lost its relevance, since the whole process is automatic. User's task - just make an external outbreak dependent on the main one. Before connecting the external flash to the Canon camera, the user needs to put the "main" standing outbreak. To do this, for this follows a few seconds to hold the "zoom" button, then you need to select the inscription "Master" using the scroll wheel and confirm the selection by pressing the center button. On the flash, you need to select "Slave" in the same way. Now she obeys the main and reacts to its impulses.
Microphone connection
For professional shooting on the video of the holiday, an external microphone will necessarily need. Most modern mirror cameras have a whole set of necessary connectors. There is an audio video output, a microphone connector, mini-hdm and others. Accordingly, you can connect the microphone to the Canon camera through connector with the inscription "MIC". All settings in the chamber are reduced only to choose, in which option you need to write sound - mono or stereo. This item is in the settings menu in the video section.

How to check the camera mileage
The mileage of the camera is the number of shutter triggements, which in turn makes it possible to understand the degree of worn out of the device.
For budget devices, the normal parameter is 15 thousand frames, after that, at any time you can wait for the breakdown, although this does not mean that it will happen in 100% of cases. In the models of the road and middle segment, this parameter reaches 150 and even 200 thousand.
For a long time, you could only learn the mileage of the Canon camera only by means sewage of the carcass. Obviously, the way is not the easiest and dangerous, because it is easy to disassemble, but to do, as it was - not very. Currently appeared more simple ways View mileage, namely, use computer programs.
Information about the mileage can be seen either sewn into the photo, or directly in the device's adhesive. It should be immediately noted that Canon prefers not to insert such information in the photo. There is a limited number of models that sew data into the camera. Thus, only checking the device itself will help. Best options Currently are eOSMSG and EOSINFO programs. Programs are distributed free and only to install them on PCs. After that, the Canon camera is connected using a USB cable. In some cases, the laptop may not see the camera, then you will need to install drivers or a special program, which in addition to the connection provides the Canon camera control from the computer. After connecting the camera to the PC and start the program in the window that opens, you need to find the ShutterCount (SHUTCOUNT) item, which shows the number of shutter trigs.
Some cameras do not have the ability to check this parameter at home. In this case, the best solution will be appeal to the service centerSo that the diagnostics show the condition of the device. So it is necessary to do if it is planned to purchase a camera with hands, and there is no information about its previous operation. The service center will be able to give an answer how much the camera is well preserved, and how much can be served.
Main faults and their prevention in Canon cameras
Mirrored cameras are fragile devices that can fail for a variety of reasons. To avoid breakage, you need to carefully treat the camera and optics, use a protective case, clean the surface of the lens, as well as with separate storage of optics and carcasses to close the connection locations with a special lid.
- Moisture hit. Moisture is a very dangerous substance for the camera. The device is not necessary to fall under the rain or wet to spoil. Its long-term foundation in a wet room can lead to oxidation of internal parts and breakdown. If there were concerns that something like this happened, then the device should be put in a warm and dry place, and then attribute to the workshop.
- Mechanical damage. Blows and drops do not contribute to the normal operation of the mirror chamber. The most fragile elements in it is a mirror that can easily break up, as well as a lens in which the focus system can fail. If the camera cannot hurt focus, then a breakdown occurred in the lens as a result of the impact. At the same time, the entire device is best for repair.
- Fit particles dust. Frequent CANON Camera Faults are associated with sand and dust intro camera. This can lead to a complete breakdown, but much more often to the extraneous noise during the operation of the lens (focus) or blocking it. In this case, only the cleaning of the camera will help, and the best solution will be the appeal to a professional service center.
- Non-compliance with thermal regime. Any camera has a range of operating temperatures. In their non-compliance, the device may well fail due to the combustion of a mechanism. It is impossible to solve this problem yourself.
- The device issues errors. The inscription "BUSY" may appear when using a low speed memory card, in case the external flash did not have time to charge from the carcass. In general, it is possible to translate this inscription as "busy": the camera hints that some kind of process is not yet completed, and you need to wait a bit. If the camera does not see the memory card or refuses to save data on it, you should format or see if the lock is on the map.
Extend the service life of the camera is very simple. First of all it is necessary purchase case which will protect the device from shocks and drops.
Tip! Do not carry the camera and the lens assembled. Best at the time of transportation to disassemble the camera.
If the camera is not used for a long time, the battery is better to pull out and periodically discharge it and charge. The chamber should be stored in a warm and dry place, as well as avoid dust or sand on it. To clean the device you need to use only special kits that allow you to carefully remove dust and garbage from the lens and other techniques.

The mirror chamber is a serious device that requires the same approach. It is impossible to just buy the camera and start shooting. To understand how to use it, deal with features and settings, extend the service life, you do not need to rush to expensive courses. For a start, it is enough for acquaintance with the instructions, where it is painted in detail what and how to do with the camera.
Even the most experienced photographer can sometimes use the programmed modes to focus on the picture, and not on the calculation of the exposure, and do not miss the chance to make a wonderful snapshot. But if you are a novice in the photo or want to expand your skills outside the car mode, then start with the zone of the green square.
When you set up the camera to take a picture, there are four basic results To choose from: high depth of field, shallow depth of field, blurred motion or frozen movement. How to find out which modes to use to get the desired result in the photo? Let's see.
Auto (Green square)
In auto mode, your camera will automatically set for you exposure, aperture, ISO, white balance and even the built-in flash.
Advantages: This is a great option for beginners - but do not become addicted to him! Use it only until you learn to configure the camera on your own.
Disadvantages: Under certain lighting conditions, automatic settings can lead to an undesirable result. For example, a portrait made at the opposite lighting will only display the silhouette. Under low illumination conditions, the image may be blurred and grain; Also, the camera can choose the use of the built-in flash to add a little light, and many models cameras do not have the flash function, if you do not want to use it.
When to use: Every time you use your camera as a compact, this is your mode.

This portrait was deliberately made in the sun in auto mode. The camera has done a worthy work on setting up the exposure, but still a snapshot for 1/2 step is underexposed. Settings auto exposition such: excerpt 1/250 sec., diaphragm F / 6.3, ISO 100.If a excerpt and ISO.acceptable, that diaphragm can it was would be reduce and to do background less distracting.
Program mode (P)
In the program mode, your camera will automatically set an excerpt and aperture, but will allow you to choose ISO, white balance, exposure compensation and flash.
Benefits: This is the biggest step for a novice who wants to have a little more control over its camera and improve photos.
disadvantages: as in auto mode, certain conditions Lighting can lead to unpredictable results due to partially automatic settings, which sometimes give results to the will of the case.
When to use: Use this mode if you want to take a step towards the complete development of the camera settings.
Priority exposure (TV - Canon) (S - Nikon)
In exposure priority mode, you select shutter speed and ISO, and the camera will automatically install a suitable diaphragm for the correct exposure.
Benefits: Great for capturing the frozen action and the blurred movement of moving objects.
disadvantages: In this mode, you control the shutter speed, so be careful with the diaphragm that the camera will choose for the correct exposure. It also matters what lens you use. Some cameras can shoot on a very short exposure, but if the lens does not have a sufficiently large diaphragm, the image will be undust-off. For example, if you take pictures of 1/4000 sec., And the correct exposure requires a diaphragm F / 2.8, but in your lens it is revealed as much as possible on F / 3.5, the image will be undust-off.
When to use: Use this mode when you need to control the motion of an object that is photographing. Use a short shutter speed if you want to fix movement, or long shutter speed, if you want to blur movement. This mode is also useful when using large mm lenses when you need to set a short shutter speed to prevent image blur due to camera shake.

The mode of exposure priority has been used with an exposure of 1/8 seconds to blur fast moving water.
Freezing so rapid Movement - 1/3000 seconds.
Athletes in motion - from 1/500 to 1/1000 seconds.
Birds in flight - from 1/1000 to 1/2000 sec.
Walking people - 1/250 sec.
Panning of moving objects - from 1/30 to 1/125 seconds.
Blur of fast moving water - 1/8 seconds.
Blinding slowly moving water - 1/2 second.

The priority of the diaphragm (AV. – Canon) (A. – Nikon.)
In the diaphragm priority mode, you choose a diaphragm and ISO, and the camera will automatically set the appropriate shutter speed for the correct exposure.
Benefits: In addition to manual mode (next paragraph), the aperture priority is the most popular mode among photographers, mainly because it makes it possible to control what will happen in focus and what is not. And in most cases, the element that is in focus makes the photo successful or doomed to failure.
disadvantages: In poor lighting conditions, the camera can choose a very long exposure, which will lead to the blurring of the image both due to the movement of the object and the shake of the camera.
When to use: Use this mode when you want to control the depth of the sharpness of your image. The greater the diaphragm, the greater the light falls on the camera sensor and the smaller the depth of field will be. Conversely, the smaller the diaphragm, the less light falls on the sensor, and the more depth of field will be. Keep in mind that the change in the diaphragm will affect the exposure rate. More Large diaphragm will lead to short exposure, and the smaller light of a small aperture is to a long one.

The diaphragm priority mode is set to increase the depth of field.
Landscapes- f / 8 or higher for greater depth of field
Portraits- Big diaphragm (F / 2.8) for shallow depth of field and blurred rear plan
Macro- f / 8 or higher for greater depth of field

Manual mode (M.)
Manual mode allows you to change both shutter speed and a diaphragm independently of each other. The camera does not make any automatic settings. The built-in exposure meter of your camera will indicate which exposure will be correct, but you can fully control the setting and the diaphragm separately to achieve the exposure that will be correct for the picture you think. Before using manual mode, it is recommended to study well a triangle of exposure (excerpt, aperture and ISO) and how they will affect the image.
Benefits: This mode gives you complete control over the image you create.
disadvantages: While this mode gives many creative options, you should be careful and all the time check the exposure of each image, especially in the conditions of a quick lighting.
When to use: After you learn how to use this mode, its effects and the results of the settings, as well as how they work together, you will use this mode almost always.

In manual mode, a small diaphragm was used to control the flu, and long exposure to blur the movement of water.
Mode Scenes
The scene mode is very similar to the car. You choose the scene, and the camera sets the settings that are optimal for the specified scenario. Various models Cameras can have different scenes, but those listed here are most popular:
Sport- The camera will increase the ISO and uses a short exposure to capture the movement.
Scenery- the camera uses a small diaphragm to maximize the depth of field; The flash can also be disabled.
Portrait- The camera will use a large diaphragm to make the background be outside the focus. Some camera models use face recognition in this mode.
Macro- The camera will choose a small diaphragm to give such a large depth of sharpness as possible.
Benefits: As in the program, this scene mode is a predominantly starting point for beginners and usually give the best result than shooting in auto mode.
disadvantages: These settings, as a rule, give the desired result, but sometimes it may differ and be unreliable.
When to use: The scene mode can be the next step for beginners after the auto mode, use it as the starting point, to explore your camera, how it is arranged, and improve your skills in the photo.
So what mode best?
What mode use depends only on you. But if you choose a car, scene or software modes and want to improve your photos, read how to set the correct exposure based on shutter speed, diaphragm and ISO; This will help you make the right settings and create. nice photos. For professional photographers The two most popular modes are manual and diaphragm priority. But remember that professionals were also new to beginners. Therefore, enjoy your experience in the photo, regardless of which mode you have chosen!

Good day! With you in touch, Timur Mustaev. How well do you know your technique? I can not deny the importance of the idea and imagination for the photo, but without somewhere, perhaps, boring technical moments can not do.
Knowledge of the characteristics of a particular camera is a pledge of productive interaction with it. And how else to get masterpiece photos? The only way. The basis of the basics can be called the ability to set the desired modes on the camera. But how to work with them? We will talk a little about this, and most importantly - we'll figure it out what the manual mode of the camera means.
About modes in general terms
Modes, or shooting methods, a very significant characteristic of the camera. They necessarily have in all cameras. The model here does not affect it, for example, Canon you or Nikon - in any case, a set of modes more or less standard. I ride quickly for the main, and in more detail we, of course, we will touch on hand.
So, on the right on the body of photographic equipment you can detect a moving wheel with all sorts of letters and symbols. It:
- Auto. And in principle, you can attribute other "colorful" modes names - landscape, portrait, night, children, macro, etc. All of their essence is that the camera itself selects the parameters, each will surely there will be small differences, but in general they are small. And I am almost sure that if you are photographing the car, then attention to the values, and other parameters, you will not pay at all. Otherwise, the regime is called - "Learning and removing!".
- Software (P). It is largely similar to the previous one, for eliminating the fact that you can set photosensitivity (ISO). Not a very big deal, I tell you, but you need to start with something!
- . In Nikon, it is indicated by the letter A, on Canon (any, for example, Canon 600D) - AV. The value f defines the photographer, and the shutter speed is the camera. Convenient way Shooting if you photograph a fixed object or landscape.
- (S - Nikon, TV - Canon). Also everything is clear, back the priority of the diaphragm: choose time. Short or long exposure, respectively, can freeze or blur movement.
- Manual (m) - Cop of creative modes. All parameters depend only on you!
Advantages and disadvantages of manual mode
Well, let's talk about the advantages and disadvantages of the last regime.
Mainly dignity M. It is the mass of the possibilities of photographing, which you manage. And this means that whatever external conditions Or the specificity of the object in the frame, you can cope with them.

Moreover, the selected values \u200b\u200bwill be saved. They will not jump with any change in the circumstances or position of the camera, as with other modes, when the camera is partially exposure.
One of the disadvantages or rather, natural consequences from the first approval - if you are new to and do not understand the camera, then you will not allow any self-configuration of the camera and can confuse you at all.
Also, as you can assume, it takes more time on manual mode, because you will yet evaluate the circumstances until you put everything.
Therefore, it cannot be called mobile, especially with constantly changing lighting, weather or shooting place.
Practice for newbies
Experienced photographers, of course, is not worth the issue, how to use M. Although it is not always priority to work. I personally often use the diaphragm mode, when I do not hurry and want to achieve an ideal picture, then I am glad to go with all the available options, selecting the necessary values.

This mode is always used when photographing in the studio.
Getting started with a manual regime can be difficult. Seeing the basic parameters on the screen, do not rush to change everything immediately. Rate Conditions: What time of day, how sunny, and configure ISO.
Next, decide on the purpose of filming, which is important to take a picture. So, if you need to make a portrait of a girl, then adjust the aperture, and the shutter speed. In the situation of freezing the moving object, definitely, it is more important to decide on: focus on 1/800 seconds. and below, 1/1000 and so on. For blurring the background around the driving object, on the contrary, the time should increase, 1/400 and so on.
Pay all attention to the built-in exposure meter that you will notice in the viewfinder. Ideally, a small arrow should be on 0 - this is a normally exposed snapshot if it is dismissed to the left or right, then it will be no underestimated or overexposed.

In what cases is the manual mode?
I want to bring some examples when manual mode will be useful.
- Shooting with low external lighting or at night, without flash. The camera will not be able to do on any other mode, except for manual, make an adequate picture - it will be too little light. The photographer can even set the lowest values \u200b\u200bat which the exposure meter will simply be used, but the camera takes pictures. The resulting picture can be lit with the help of the exploration or already in post-converting. In this case, an example can serve, shooting sunsets, an exact or evening city and so on.
- In studios. It is necessary to synchronize the camera through a special device, synchronizers. And this synchronization is most often made thanks to a predetermined diaphragm, excerpt and photosensitivity.
- Special lenses are manual, which have problems with the transmission of information about the diaphragm from the camera.
- Creating high-resolution HDR images, that is, the picture in this case consists of several other, taken with different parameters. Manual mode here is also useful if you are a professional and know which photo in the end you want to get.
I wonder what other parameters can be set up manually? If you carefully look at the menu, you can find a lot of interesting things.
Different funny chips are available even to the owners of soaps or not very expensive sirrons, for example, Nikon D3100 and its series. We must use any opportunity to somehow improve your frame, make it unique. Settings to help us!
Here you can select the following: in the Kelvinam, brightness and saturation at the photographing stage, the area and location of the focus point, etc. But it is completely different articles.

Output
Well, how do you have a manual mode? Complicated? In early always, do not be discouraged, now I will tell you a little trick, for a more complete understanding of this regime.
Take some item you want to photograph. For this example, conditions are not important, you take off at home or on the street. Put the camera to the auto mode, only without flash, it is also on the wheel, only designated by the sign of the crossed lightning. It is advisable to fix the camera.
You can use the table. One end to put the subject, and on another camera. The distance between them should be within 1 meter.
Move the device on the item and click on the shutter button on the half, so that the camera focuses on the subject, but do not push to the end. Either in the visor (the eyes, where you look in the mirror camera), or the values, excerpts, aperture, ISO will appear on the screen. Write them down. After writing a data, you can press the button to the end and take a picture, let you have as an option.

Go to M mode, set the settings that you recorded and take a picture. We look at how it happened. Next, begin to experiment. If the snapshot turned out to be dark, you can open a diaphragm, i.e. Put the value less than 5.6, 4.0, 3.5. Or increase the shutter speed, 1/400, 1/200, 1/100, and so on.
If, on the contrary, the photo turned out to be bright, reverse actions of the aperture and excerpt. ISO Try not to touch, but better bring it to 100 and practicing with exposure and diaphragm.
But remember than the value of the diaphragm less, respectively, less!
Food you want to develop in the field of photographing and learn how to do it well, the full mastering of the manual mode is necessary. I can also recommend good video course below. It tells in detail what a mirror camera is capable of. Many chips and photography secrets are revealed. Everything is shown on the examples. It is described, everything is very accessible and understandable. Recommend!
Digital Filler Diggle 2.0 - For owners of the Mirror Camera Nikon.

My first mirror - For the owners of the Canon mirror photo.

See you! Dear readers, do not be lazy to learn your camera. And my blog will help you with this! To not miss the useful, subscribe to the update. Share with friends, I will be very grateful.
All of your favor, Timur Mustaev.
95% of my friends, buying a mirror camera, only use the automatic shooting mode with pre-installed plots: portrait, landscape, macro, etc. Maximum, some of them, once in life, include manual mode, and without realizing it in it - forever turn off.
But is it so good this auto mode - let's understand? The more you use the camera, the more you know that the framework of the auto shooting you becomes little. Not always, for example, auto mode can clearly cope with the shooting in places with poor illumination. Let's deal with.
As a rule, in all mirror cameras, in addition to automatic regime with plot programs, there are 4 more modes involving the direct participation of the photographer in the frame setting. Consider them in more detail.
- "P" software automatic mode.
By and large, this is the same automatic shooting mode. The only one, you can configure some parameters: White balance, matrix sensitivity, JPEG settings, etc.
Application: Used when there is no time for manual settingsWhen you need to make a fast frame. This mode is useful for beginner photographers. This is a smooth transition from cars to more manual modes.
- "S" Exposure Priority Mode.
The photographer sets an excerpt, and the camera is a diaphragm (F).
Application: This mode applies when you need to emphasize the movement in the frame. The effect of "blurred movement" with long exposure or clear fixation of the object with a short one. This mode is excellent for shooting sports and household events, fountains, water, cars, etc.
With this mode, as a rule, it suffers a clear background.

- "A" diaphragm priority mode.
Unlike “ S "the regime, here you already set the value of the diaphragm, and the camera picks up the camera. According to many photographers, it is the most convenient shooting mode. The diaphragm values \u200b\u200bare less than exposure values. Driving a diaphragm is much easier.
Application: Suitable for shooting portraits (1.2-2.8 min. Validity of the diaphragm), landscapes (16-22) and static macro.

- "M" manual shooting mode.
The photographer manually sets all the parameters. If you want to become a real professional, you need to work and experiment with this mode. In this mode, you can do absolutely any pictures. The only lack of manual mode is time. While you will configure the camera, you can miss the frame.
Application: Ideal for night shooting and studio photo sessions. With manual mode, you can experiment, for example, deliberately translating the frame, and the like.

© 2013 Site
Today, any digital camera offers a photographer frightening variety of shooting modes. Due to the fact that the instructions for cameras describe the features and purpose of this or that mode is very foggy, a beginner photographer is difficult to determine which modes are really useful, and what is the essence of marketing nonsense. As a result, many either spit on everything and remove exclusively in mode AUTO. without trying to dig deeper, or by believing the authors of the instructions, they are trying to use narrow-minded storylines (portrait, landscape, sport, macro, etc.), without suspecting that by putting a minimum of thought efforts, you can achieve much more flexible and complete control. Over the camera without any damage to its own comfort.
| Canon | Nikon. | Sony |
Understanding the digital camera modes is the most simple of what you, as a photographer, should learn. If you are familiar with the concepts of excerpt and aperture, then for you will not be difficult to figure out and with the shooting modes.
The main modes of exposure determination
Starting from the 80s of the last century, four modes are standard for most cameras: software mode ( P.), the priority mode of the diaphragm ( A. or AV.), exposure priority mode ( S. or TV.) and manual mode ( M.). In the yard of the XXI century, but nothing fundamentally new camera manufacturers did not come up with. Using the classic fourth, you can still remove anything. Other modes (with rare exceptions) - from evil.
Software
P. - PROGRAM AUTO. Software machine or software line mode is not only the most preferred mode for a novice photographer, but also a completely acceptable choice for an experienced photographer, especially in situations where to shoot in a hurry.
In the program mode, the camera independently sets a suitable combination of aperture and shutter speeds in accordance with the lighting conditions and the ISO sensitivity (see light and exposition numbers). The default is the following range of combinations: F / 2 * 1/15; f / 2.8 * 1/30; f / 4 * 1/60; F / 5.6 * 1/125; F / 8 * 1/250; f / 11 * 1/00; F / 16 * 1/1000; F / 22 * \u200b\u200b1/2000, etc. Within the range of the diaphragm numbers of a particular lens and the valve range of a specific chamber. Of course, intermediate values \u200b\u200bof the form are possible: f / 6.3 * 1/160; F / 7.1 * 1/200; F / 9 * 1/320; f / 10 * 1/400, etc., since the values \u200b\u200bsuch as shutter speeds and the diaphragms are usually changed in a third step step.
To reduce or increase the exposure relative to the proposed automata, the function of exposure or exposure compensation is used. For example, during contrast illumination, many cameras have to reduce the exposure to 1/3 or 2/3 of the stage to avoid overexposure in the lights, and when shooting winter scenes, the exposure should be increased so that the snow does not step on with gray. Usually, the exploration is controlled by a special button (+/-) in combination with the main disk of control. It is even more convenient when a separate disk is provided for the exploration.
A feature of good cameras is the ability to make a program shift, i.e. Select equivalent combinations of aperture and excerpts to obtain the same exposure in accordance with the law of interconstruction.
I will give an example. Typical exposition on a sunny day is achieved by an expipope F / 8 * 1/250 with ISO 100. According to the principle of interoperability, the same exposure can be obtained using any of the following combinations: F / 2 * 1/4000; F / 2.8 * 1/2000; f / 4 * 1/1000; F / 5.6 * 1/500; f / 11 * 1/125; F / 16 * 1/60; F / 22 * \u200b\u200b1/30. Rotating the corresponding disk, you can shift the program or towards large aperture values \u200b\u200band longer exposures, or towards shorter exposures and smaller diaphragm values. Such a program is called flexible.
The ISO sensitivity in the program mode is installed either manually or automatically, depending on your preferences and camera capabilities.
Priority of the diaphragm
A. - Aperture Priority or AV. - Aperture Value. The diaphragm priority mode deservedly love very many photographers. In this mode, you independently install the diaphragm value yourself within the range limited by the lens design, and the camera automatically selects the appropriate shutter speed to it. The exploration in this case also affects the shutter speed, as an only variable in the exploration.
Most of my works are removed in the diaphragm priority mode. Manual diaphragm control means full control over the depth of a sharply depicted space, which is extremely convenient both when shooting landscapes, when the depth of field must be maximum and in portrait shooting, when you want to visually separate the object from the background with a small flu. In addition, the total image sharpness depends on the diaphragm, and therefore it is very desirable to keep under the supervision of such an important parameter.
Exposure priority
S. - Shutter Priority or TV. - Time Value. Excerpt priority mode is the opposite of a diaphragm priority. In this case, you are installed manually exposure, and the diaphragm selects the camera. The exposure priority is useful when it is necessary to limit the minimum shutter speed to prevent lubrication when shooting fast moving objects.
In general, this mode is less convenient and universal than the priority of the diaphragm, since, firstly, variations of excerpts are not so noticeable effect on the image as a change in the diaphragm, and secondly, due to the fact that the range of diaphragm numbers is noticeable already the range The shutter speeds, the camera, while in the exposure priority mode, often rests on the limit values \u200b\u200bof the diaphragm, which is poured into the undersensation or overexposure of the frame. By the way, it is usually possible to limit the minimum shutter speed now through the automatic ISO sensitivity settings.
Manual mode
M. - MANUAL. Manual mode implies how it is not difficult to guess, the manual installation of both the diaphragms and excerpts. The camera's exposure meter continues to work, determining the exposure faithful from its point of view, but its testimony is only a recommendation in manual.
Manual mode is suitable for unhurried work in the studio (especially with pulsed light) when the lighting remains unchanged from the snapshot to the picture, and you know better than your camera, which exposure you need. Also, manual mode can be useful in specific situations when the exposure meter can behave inadequately, for example, when shooting night landscapes with a star sky. Another area of \u200b\u200bapplication of manual mode is to shoot with panoramas, since in this case it is usually necessary to strictly the same exposure for all frames in the future, and in automatic modes, some of its oscillations are always possible.
In all four classic modes, the photographer is available a full range of exposal settings, ISO sensitivity, white balance, autofocus, flashes, image styles, etc. They are profitable from the soapy modes, which will be discussed below.
AUTO mode
Fully automatic or green mode does not need a view. The camera thinks about everything. Not only exposure and aperture, but also autofocus, flash, white balance, word, is determined everything under its control. Is that the button itself does not prescribe ... although already in this direction of work is carried out.
Often, mode AUTO. Supplemented by almost identical to him "Without flash".
Listen to the Good Council: If you still take off in mode AUTO. , then try at least in the order of the experiment to go to the software mode ( P.). You will not lose anything absolutely, but you can consciously vary the degree of automation of the shooting process, i.e. Self decide: what parameters to leave the camera on the spill, and which to control personally. Already one only access to the exploration will allow you to significantly improve the quality of your pictures, which reduces the error of the exposure meter. Add to this white balance management and image styles and your photos will be blocked with completely new paints.
Scene modes
Scene modes are available, to Sorrow, almost in every camera, except except harsh professional models. These programs are designed to ease the life of the photographer when shooting a certain set of standard scenes, but in fact, the onylum modes are only confused by a beginner. If plot modes in the chamber so much that they do not fit on the disk, they are usually hiding under the overall inscription Scene. or SCN..
I have to touch the most common storylifts to show you that there is no magic in them, and that, in fact, they are just functionally defective derivatives from the classical exposure determination modes.
Portrait
In portrait mode, the camera only sets the lens diaphragm to the maximum (minimum number of the diaphragm) to achieve a shallow depth of field and blur the background. If the program is called a "night portrait", the flash will work in slow sync.
Scenery
And here, on the contrary, the camera seeks to cover with a diaphragm so that all the removable objects are in focus. In addition, the use of the outbreak is unacceptable in the landscape mode, although, in my opinion, the filling outbreak to illuminate the foreground is not the latter even in the landscape shooting.
Sport
To shoot fast-moving objects, such as athletes or children, the camera opens a diaphragm and strongly raises the ISO sensitivity to ensure a sufficiently high shutter speed.
Macro
In the macrophage, the mirror chamber sets a diaphragm on the f / 8 and ... everything. Change lens it without your help is unable. And what is f / 8 when macro? What if you need f / 11 or f / 16? Compact cameras with a non-free zoom lens behave in the "Macro" mode and is absurd at all, setting the lens to the maximum wide-angle position, which is at least stupid.
Constantly inventing more and more exotic plot modes like macroeoms of pets on a night beach, but I don't even want to spend your own and your time.
So why should not use plot modes? Yes, because they simply limit your creative potential, tosing you to a limited set of plots and an even more limited set of options in each mode. What should I do if I want to change the depth of the sharply depicted space? Or synchronize the outbreak on the back curtain? Or change the ratio of external exposure and exposure of the outbreak? Or turn off the car ISO when shooting from a tripod? Who needs flawed unrelaxed when traditional P., S., M., A. Provide photographer full freedom and at the same time control over the photo.
Scene modes along with the mode AUTO. , exist for those who do not want to think during the shooting, but it is the habit of creating consciously Distinguished by an artist from mediocreness.
Do not be afraid of classical modes. To begin with, turn around with the software mode ( P.), And also learn how to use the exploration and white balance - the most important settings of the camera. You will make sure that there is nothing terrible and complex in controlling the camera, and the benefits of this skill is very considerable.
Custom settings
A pleasant exception among new-fashioned trends is a group of modes designed to save custom settings, and the subsequent instant call. In Canon cameras, user modes are indicated by the letter C. (from Custom), in Nikon and Pentax - Letter U. (User), Sony - Mr. (Memory Recall). They work approximately the same, allowing you to save a more or less complete spectrum of camera settings, so that then quickly switch between different banks of settings depending on the shooting situation. In essence, it can be compared with the creation of your own storylines, but already fully meet your preferences.
The presence of custom modes is very accelerating work, and it remains to be regretted that they are not present in every chamber.
Additional modes
Some modes are specific for the cameras of a certain brand, or even for specific models. Here is some of them.
Exposure by hand
B. (Bulb). This mode must be chosen on some Canon and Pentax cameras to get an exposure longer than 30 s. IN bulb mode Camera shutter remains open so much time as the descent button is pressed. Usually in such situations use a trigger or remote disk. IN nikon cameras Hand shutter speed is available in manual mode (M).
Exposure priority and diaphragms
TAV.. It is found in Pentax devices. In this mode, the photographer personally sets exposure and aperture, and the camera adjusts the exposure by changing the ISO sensitivity. Mode with dubious utility. By the way, in Niconah, a similar trick is possible in M \u200b\u200bmode when AUTO ISO is enabled.
Flexible mode
FV (Flexible Value). It is seen on Canon migratory cameras. FV mode is a somewhat enhanced program mode. In essence, it works as well as P mode, but allows you to manually set the desired values \u200b\u200bof the shutter speed, aperture and ISO.
Synchronization with flash
X.. Only in PENTAX devices. In fact, this is the mode of exposure priority, in which the shutter speed is fixed and corresponds to the synchronization shutter speed with a flash (usually 1/200 or 1/250 C). Obviously, Pentax has too much free space on the mode selection of modes, once the synchronization shutter poses a separate mode.
The priority of the depth of field
A-DEP.. Present on Canon amateur models. Something like the priority of the diaphragm, but the diaphragm is not chosen by the photographer, and the camera, so that all objects covered by the autofocus sensors fall into the depthscence zone. The focus remote also selects the camera. The mode, apparently, was created for those who do not know what they need the depth of field and where the focus should be.
Help mode
Guide. It is a distinctive feature of the junior Nikon models. Allegedly designed to facilitate the training of the Azame photography, but in reality slows down the shooting so much that everything is interesting for a long time before you read the next advice to the end.
Creative authemory
CA.. There is a Canon apparatus and is a cross between fully automatic and software modes. Close to the GUIDE mode near Nikon. CA mode gives the user a slightly big freedom than the green regime, but most of the functions still remain blocked.
Video
Video.. In some cameras, the video card is carried out in a separate mode. Well? Quite a reasonable solution.
There are many other modes, but they are not sufficiently common to be of interest to the general public. If the pictogram is present on your camera, the meaning of which is not clear for you, refer to the instructions for satisfying your curiosity.
Thanks for attention!
Vasily A.
POST Scriptum
If the article has been useful and informative for you, you can kindly support the project, making a contribution to its development. If you didn't like the article, but you have thoughts on how to make it better, your criticism will be accepted with no less gratitude.
Do not forget that this article is the object of copyright. Reprint and quoting is allowed if there is an existing reference to the original source, and the text used should not be selected or modified.